04-04-2026
Campus Locator
A small campus locator project that shows a 3D map with the locations of all iO digital campuses around the world.
- Next.js
- React Three Fiber
- Maplibre GL
- Zustand
About this project
During my internship at iO Digital, my teammate, Kaj Botty and I built a campus locator app. It was a pretty simple project. The idea was to show all the iO digital campuses on a map. We would also add search functionality so you could easily find the campus you're looking for. We had a lot of freedom in how we wanted to approach this so we chose some of the tech stack. Furthermore, we also expanded on the assignment slightly by choosing to use a 3D map and 3D models instead a of a simple 2D map.
How it works
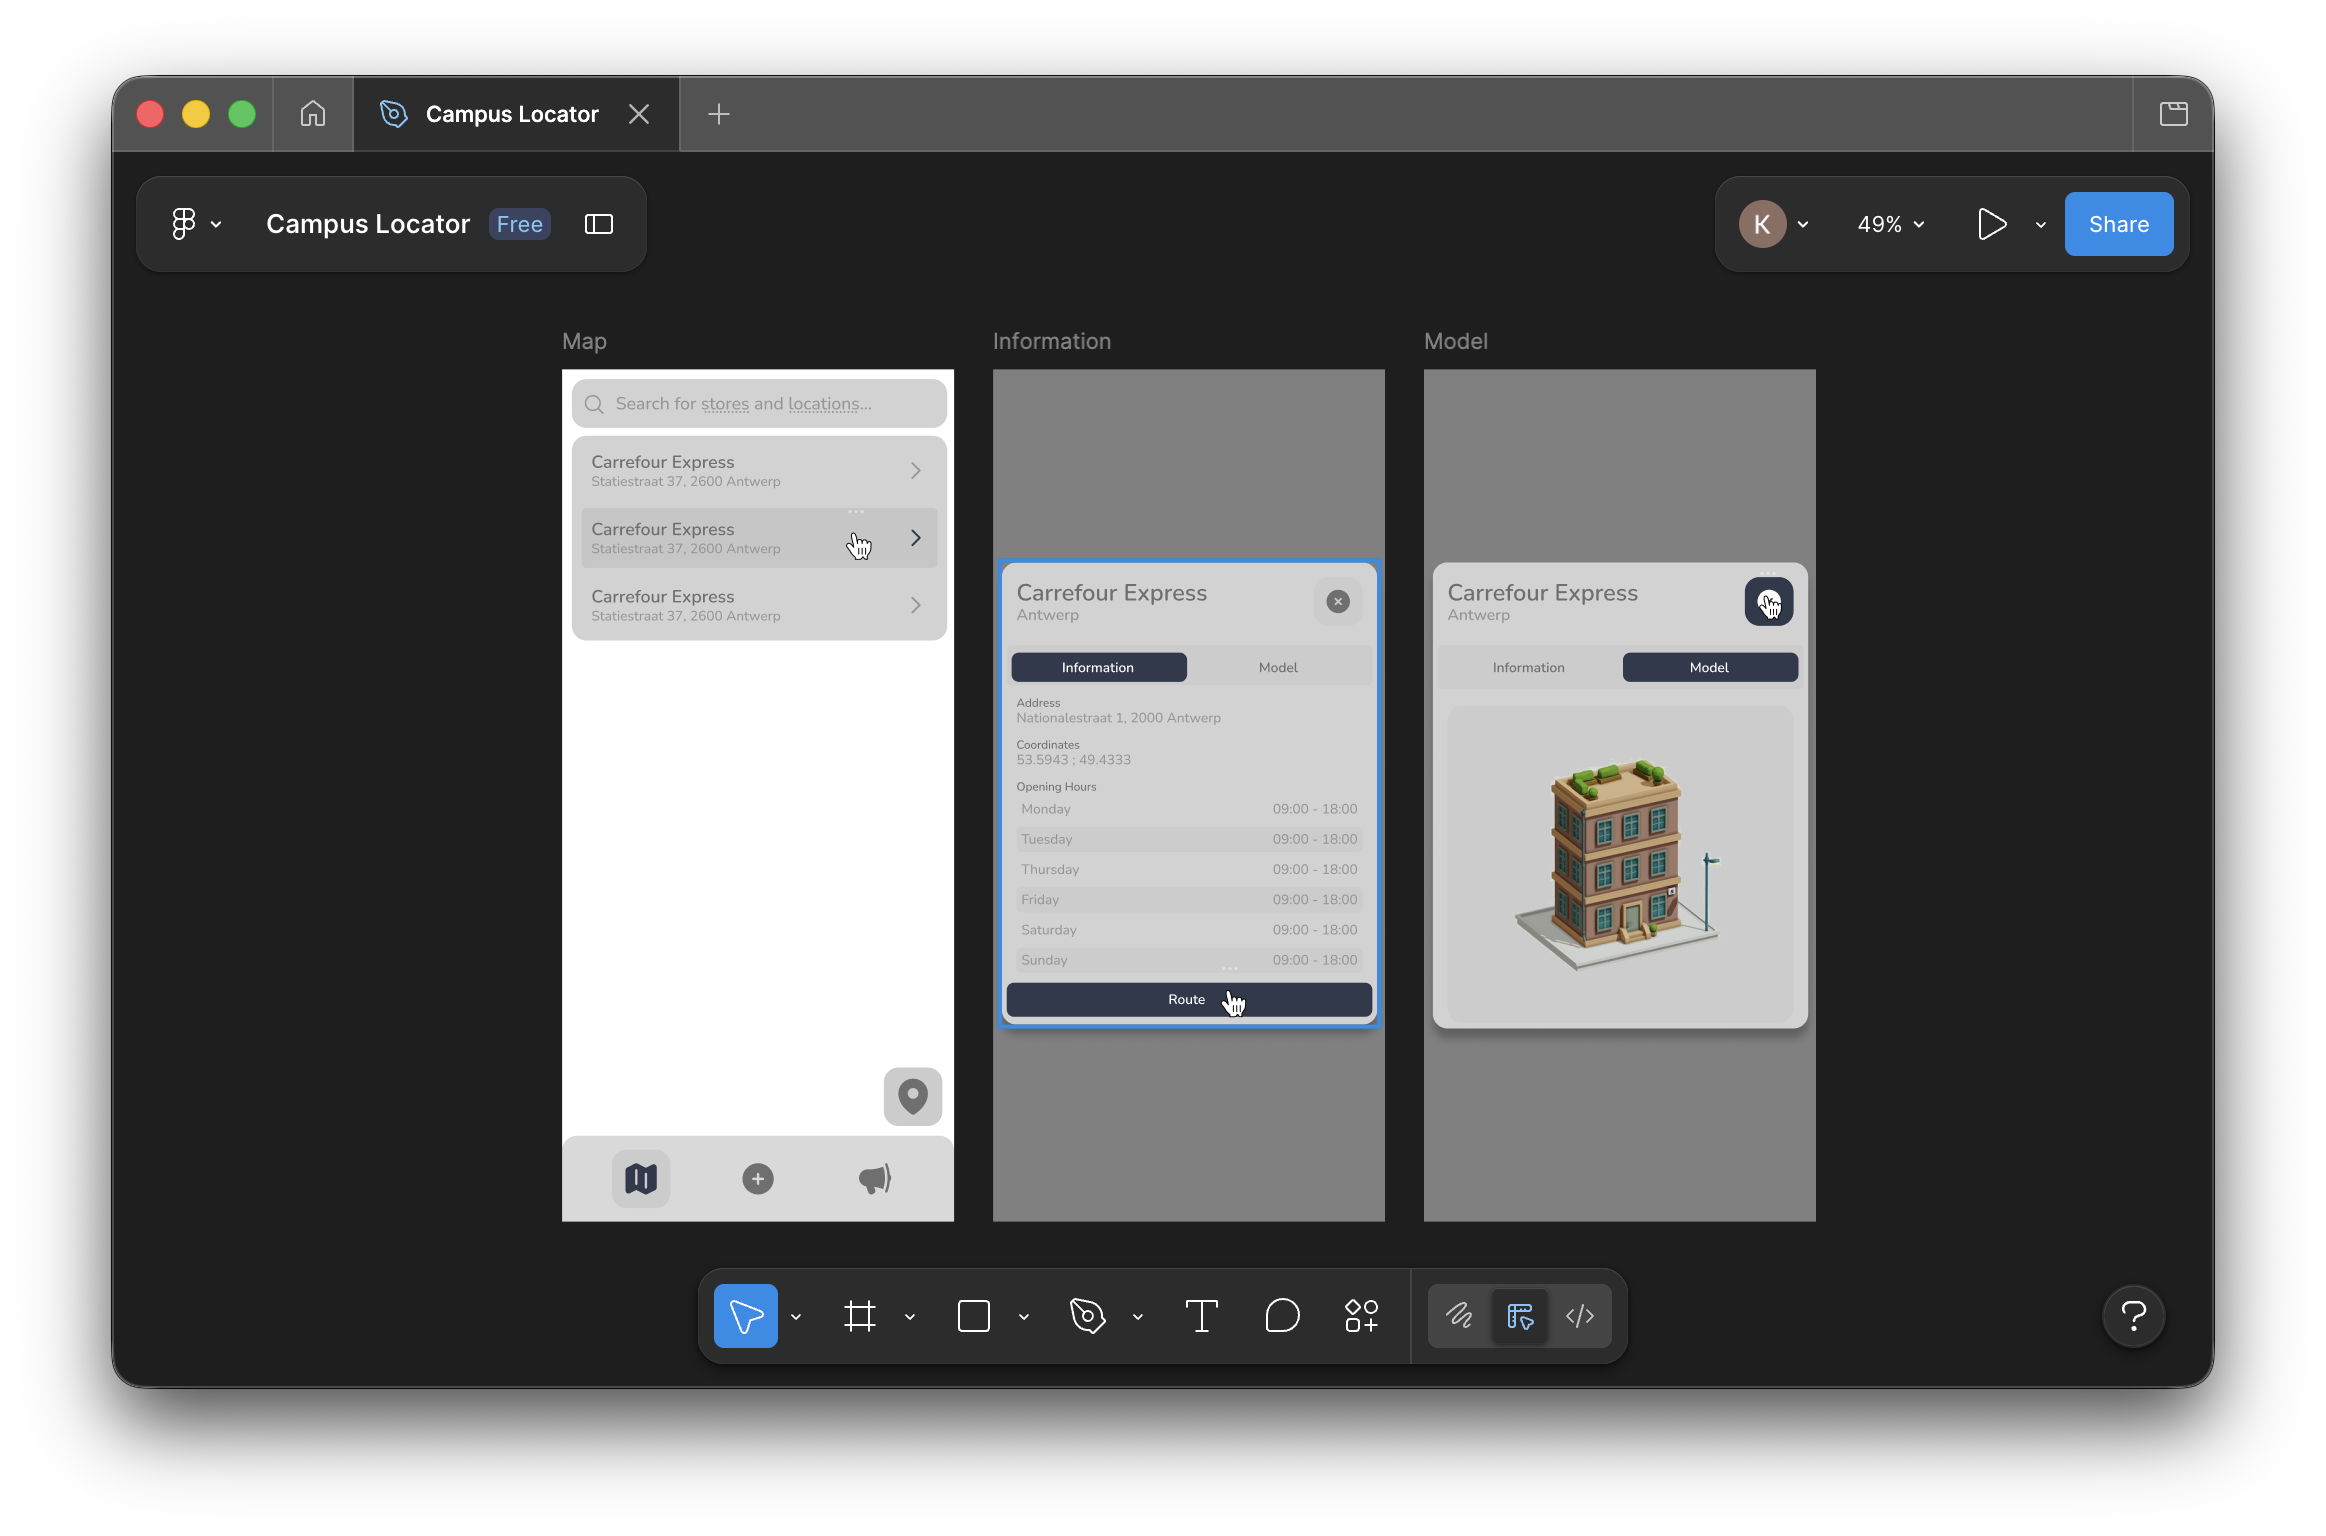
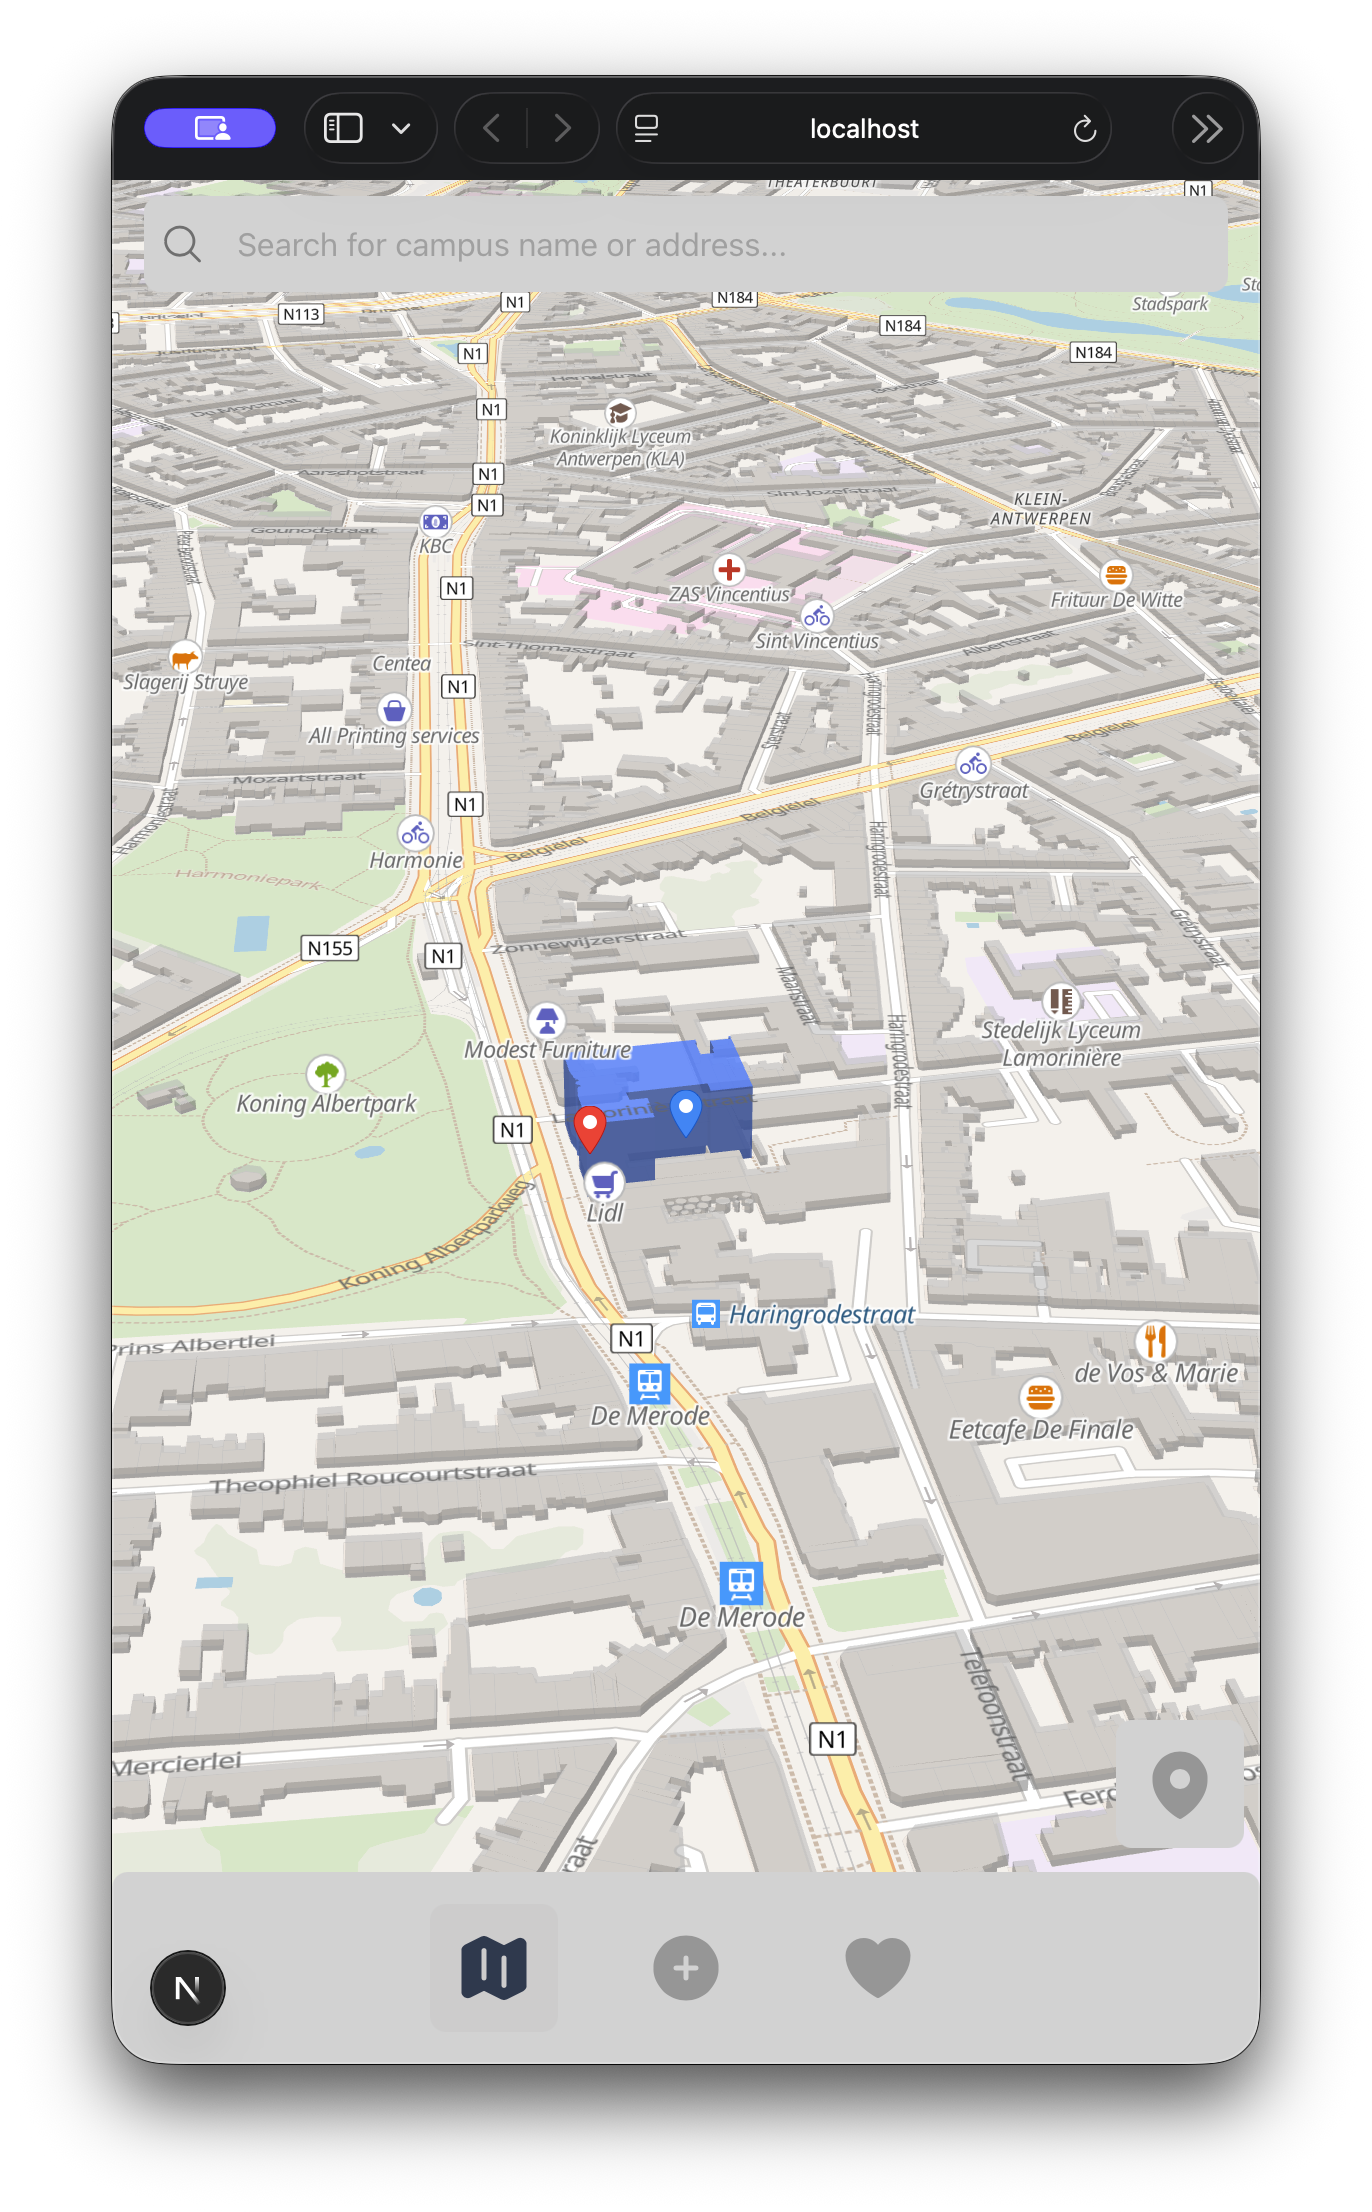
The app shows a 3D map with markers for each campus. Each campus is also shown as a bigger 3D model than the surrounding buildings so it stands out more. When you click a marker, the camera moves to that location and a dialogue box with more info appears about that specific campus such as address, opening hours, etc. There's also a "model" tab that shows our own made 3D model of the campus without any surrounding buildings than you can rotate around.
The tech stack
1 - Next.js
We used Next.js for the frontend because it's what we would need later for our bigger internship project so getting familiar with it was a good idea.
2 - React Three Fiber
This is the library that we use to display our own 3D models from each campus. It's basically React for Three.js which is a 3D library for the web. It allows us to easily create 3D scenes and objects using React components. Not only that, but it also allowed us to provide orbital controls, so users can rotate the model we made around.
3 - Maplibre GL
We used Maplibre GL for the map itself. It's open-source, works with React and gives you a lot of control over how the map looks. It took some time reading through the documentation to figure out exactly how to use it. Luckily they also had a bunch of examples on their website which helped a lot. Our map was created using two main map layers. The first layer shows all the buildings in a gray color and relatively small. Then we created a second layer on top of that but only for specific buildings — the iO Digital campuses. We provided that information through a simple json file.
4 - Zustand
We used Zustand for state management. It's pretty lightweight and works really well with React. We also had a bit of previous experience with it before. We had two zustand stores which were quite small since it's not that big of an app. One store kept track of the selected campus, the other of our user. Here's what that looked like in the code:
campus.ts
import { create } from "zustand";
import type { Location } from "@/models/location";

interface CampusStore {
    campus: Location | null;
    select: (location: Location) => void;
    deselect: () => void;
}

export const useCampus = create<CampusStore>((set, get) => ({
    campus: null,
    select: (location: Location) => set({ campus: location }),
    deselect: () => set({ campus: null }),
}));
location.ts
import { create } from "zustand";

interface LocationStore {
    userLocation: [number, number] | null;
    setUserLocation: (coords: [number, number]) => void;
}

export const useLocation = create<LocationStore>((set) => ({
    userLocation: null,
    setUserLocation: (coords) => set({ userLocation: coords }),
}));
5 - Tailwind CSS
We styled everything with Tailwind CSS. My teammate made a nice Figma design for the app and with tailwind it was also pretty easy implement that design.
The map setup
The map was probably the trickiest part since we never used Maplibre GL before. The base map itself is a fairly standard Maplibre setup, just tilted from the start so it already has that 3D feel before you even select a campus:
export function createMap(
    container: HTMLElement,
    longitude: number,
    latitude: number,
    zoom: number,
) {
    return new maplibregl.Map({
        container,
        style: "https://tiles.openfreemap.org/styles/bright",
        center: [longitude, latitude],
        zoom,
        pitch: 60,
        bearing: -17.6,
        canvasContextAttributes: { antialias: true },
    });
}
The part that took some effort was getting the buildings to extrude in 3D since the base style only gives you flat ground tiles. We had to do this by creating a fill-extrusion layer.
export function addBackgroundBuildings(
    map: maplibregl.Map,
    labelLayerId: string | undefined,
) {
    map.addLayer(
        {
            id: "buildings-background",
            source: "buildings-source",
            "source-layer": "building",
            type: "fill-extrusion",
            minzoom: 14,
            paint: {
                "fill-extrusion-color": "#aaa",
                "fill-extrusion-height": 4,
                "fill-extrusion-base": 0,
                "fill-extrusion-opacity": 0.5,
            },
        },
        labelLayerId,
    );
}
The 3D models
This part was mostly my teammate, Kaj Botty's, work. We used Blender to create custom 3D models for each campus, trying our best to give it a similair shape to the actual campus building. I tried making one of the models but since I wasn't super familiar it was pretty hard and in the end I messed it up. It was a fun experience though.
After the models were ready I loaded them into our project using React Three Fiber. We used the GLTF format for the models since it's a pretty standard format for 3D models on the web.
export default function Building(props: Props) {
    const { scene } = useGLTF(props.building);
    const modelRef = useRef<THREE.Group>(null);

    useFitCameraToModel(modelRef);

    return (
        <primitive
            ref={modelRef}
            object={scene}
            scale={1}
            position={[0, -0.5, 0]}
        />
    );
}
The campus information panel
When you select a campus, a dialog slides up with all the details. We used a tab system to switch between information and the 3D model:
export enum Tabs {
    INFORMATION = "Information",
    MODEL = "Model",
}
The information tab shows the address, coordinates, and opening hours in a clean table format. There's also a "Route" button that opens Google Maps with directions to the campus.
The model tab just shows the 3D scene again, but in a smaller container inside the dialog. This gives you a closer look at the building without leaving the info panel.
User location tracking
The app requests permission to use your location. When granted, it adds a custom marker for your position on the map:
userMarkerRef.current = addUserMarker(map, userLocation, userMarkerRef.current);This marker is different from the campus markers, using a blue pin instead of red so you can easily tell where you are.
What I learned
This project was relatively small but still interesting. It gave me a chance to work more with React Three Fiber which I had only used a little before. Of course, we also touched some new technologies like Maplibre GL and for me Zustand was also pretty knew so I was happy I got a chance to see how it works in a real project. There was also the fun aspect of blender that we decided to do ourselves. I definitely wasn't that much help in that part but it was fun to try and learn a bit about 3D modeling.